Build a redwood trellis
by Leon A. Frechette
There is no better way to attractively fill a space between your
yard and the neighbor's than with an easy-to-construct redwood trellis.
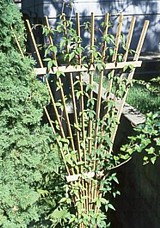
Imagine this trellis with clematis spreading its white, red, pink,
or purple flowers all the way to the top.
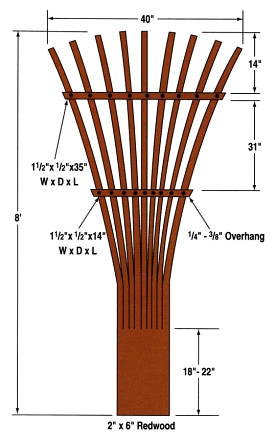
For a full view of the trellis drawing, click on trellis drawing
image . . .

Redwood Trellis |
 |
To build this project, you will need a table saw, finish hammer,
finish nails, and waterproof glue. This is a simple project that
can be completed in less than two hours.
Here are a few things to keep in mind before you start and during
construction:
- When choosing your lumber, choose a piece with as straight a
grain as possible.
- Be sure to support your lumber with an outfeed table.
- When attaching the upper cross-member to the fingers (slats),
be sure to pre-drill both the cross-member and the fingers. Begin
by attaching the cross-member to the two outside fingers first,
then to the middle finger, and then evenly space the rest.
- Take care when spreading the fingers. Depending on your wood
grain's direction, they can crack—or even break—during
this procedure.
- Add the bottom cross-member last.
Will you save money by building your own trellis? Of course—however,
how much you save will depend on the style you choose to build and
the cost of materials in your area. Constructing the standard trellis
shown could save you at least 50 percent. More than that, the quality
will be much higher than with an assembly-line product—not
to mention the pride that goes into it. Watch out! Before you know
it, you'll be building them for your friends and relatives!
Visitor's feeback 3/19/07: Hello, and thanks for the
inspiration to build my own trellis! I found your plans online, and they were GREAT! I do have one suggestions: instead
of starting from a 2 by 6 piece of redwood (which can cost upwards of 50 dollars, and is REALLY hard to find, depending on where you live), start with 1 by 2's, and screw them together to make the fan. You'll save money by buying smaller pieces, and you'll save the headache of having to rip down a beautiful piece of 2 by 6 that should've been used as decking! Just an idea. Later, Sean...
Copyright ©
1994, 2000, & 3/19/07 LAF/C.R.S., Inc. All rights reserved. Information used in this
article,
in whole or in part, appeared in the February 1995
issue of Woodworker.
Looking for home improvement Q&As? Click here!
[ Back to Top ]
|


